
This post contains affiliate links, so if you make a purchase we may be compensated. Hopefully you love anything you might purchase as much as I do!
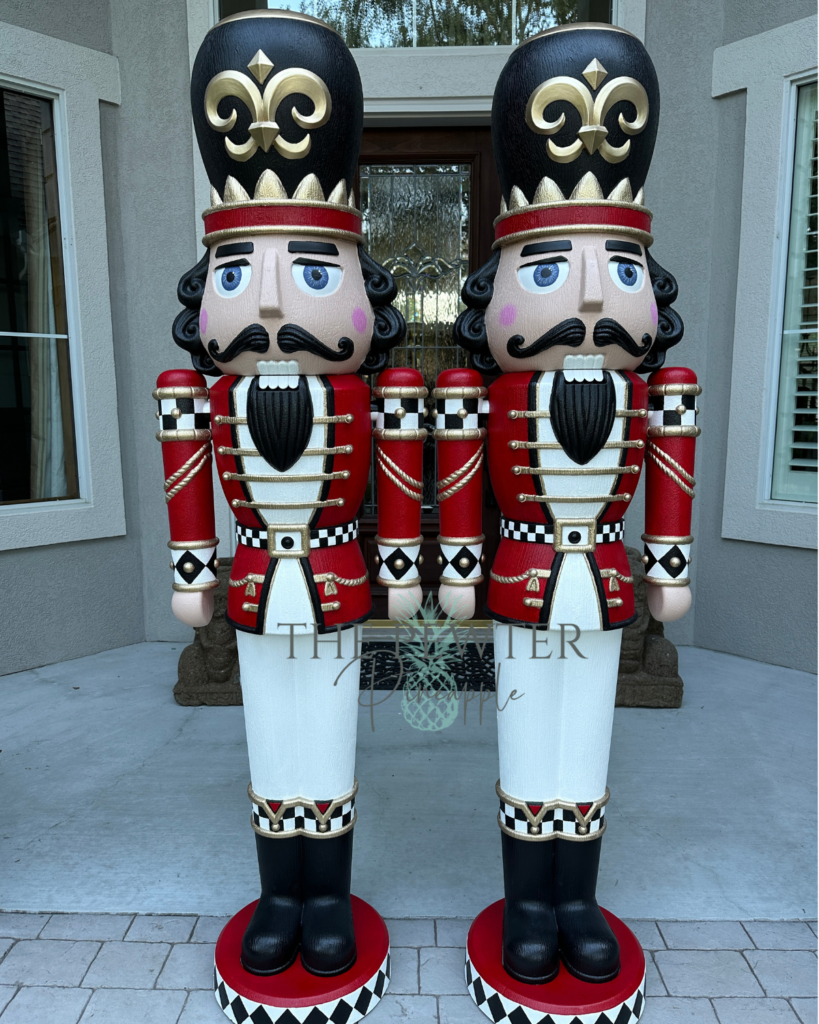
Last fall I started to see these super fun giant nutcrackers all over social media. People were painting them in all different designs and creating totally unique and fun decor for their homes. I thought, “Wow, that looks super fun. I wish I had somewhere to put those in my own space!” Fast forward to this year and I get a text from my mom asking if I had seen the Walmart nutcrackers that you paint. I said “Of course!” but that I’ve heard they’ve been really hard to get in the past.
A few weeks later we were at Walmart and decided to check out some of their Christmas decor. We went to the outdoor section and I was so excited to see a spot on a shelf where these nutcrackers would go! There weren’t any there so I checked the app which also said they did not have any in stock, but I thought it was a good sign that maybe they were coming soon. I made a mental note to check back often. As we were walking out of the garden center I looked to the left and there they were!!! Five glorious giant nutcracker boxes.
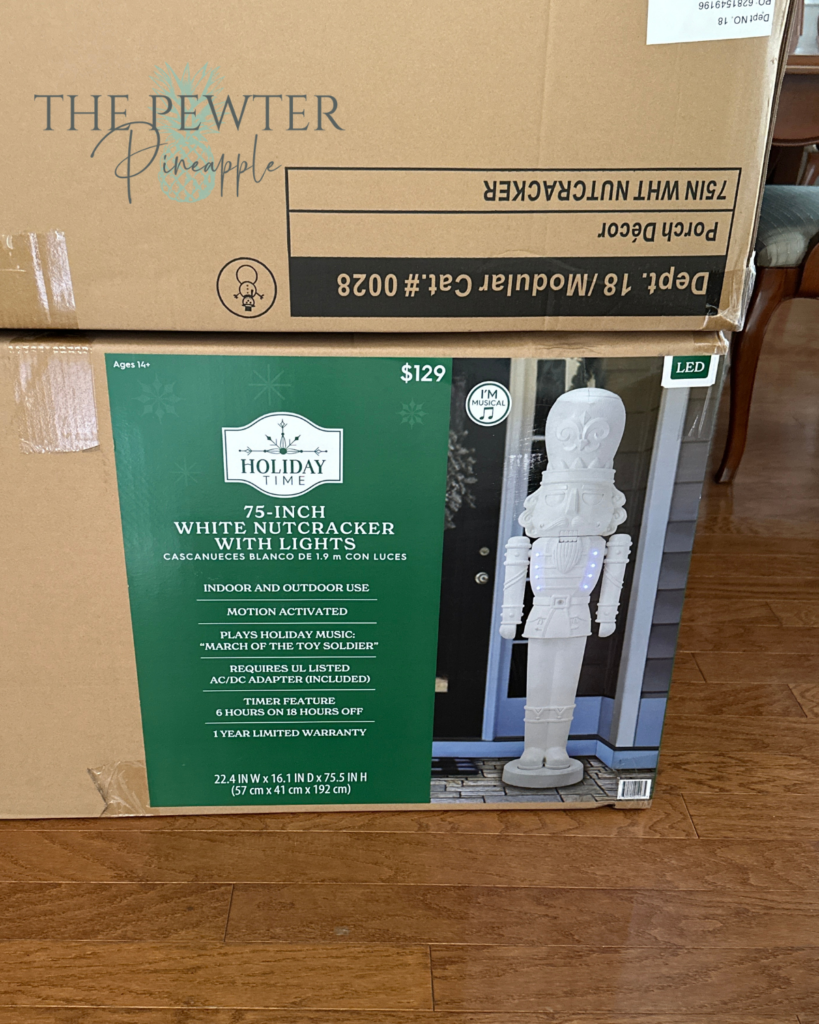
As we debated about whether we were ready to take on this challenge, a woman came up and got one and we started chatting. She had already found one nutcracker at another Walmart and had driven 45 minutes to our Walmart after getting the call earlier that morning that they had arrived. After noodling for a few minutes we decided to commit and get 2 nutcrackers for my moms front porch. An employee came up to help us wrangle them into the carts (which was kind, but surprisingly unnecessary as I was able to easily lift and carry one on my own) and he said they had gotten 8 in that morning, 3 were gone by the time we got there and then between us and the other woman another 3 went out, so by about 11am they only had 2 left! Moral of this short story is that the app is not accurate and apparently there is a list you can get on to receive a call when they arrive at the store. It sounded like you would join that list at the customer service desk.
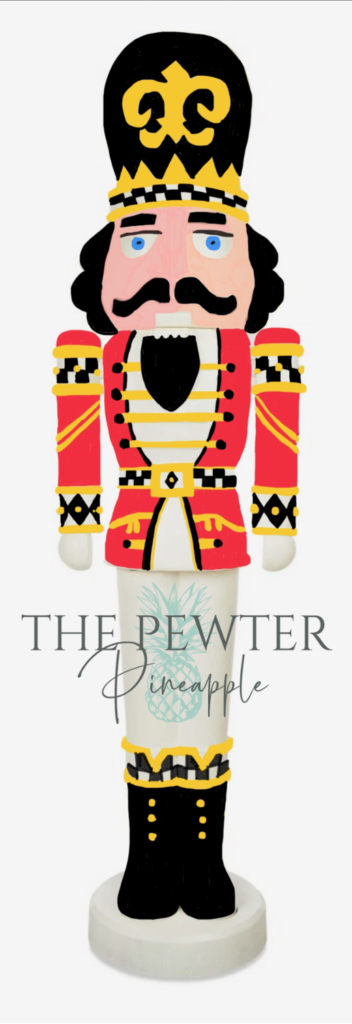
We looked at tons of different nutcrackers to get an idea of what we might like to do design wise. We were coming up with great ideas but felt like we needed a visual tool to see exactly how everything looked together. So I took a screenshot of the plain nutcracker on the Walmart app and opened it in photos on my iPad. Then we used the photo markup tool to create our design. It made it so easy and we could pass it back and forth to make changes and try things. Quick note about this: Be sure to take a screenshot every once in a while because when I went to save it the first two times, the iPad freaked out and deleted everything. If you take screenshots you can easily open one of those if the iPad looses your work.
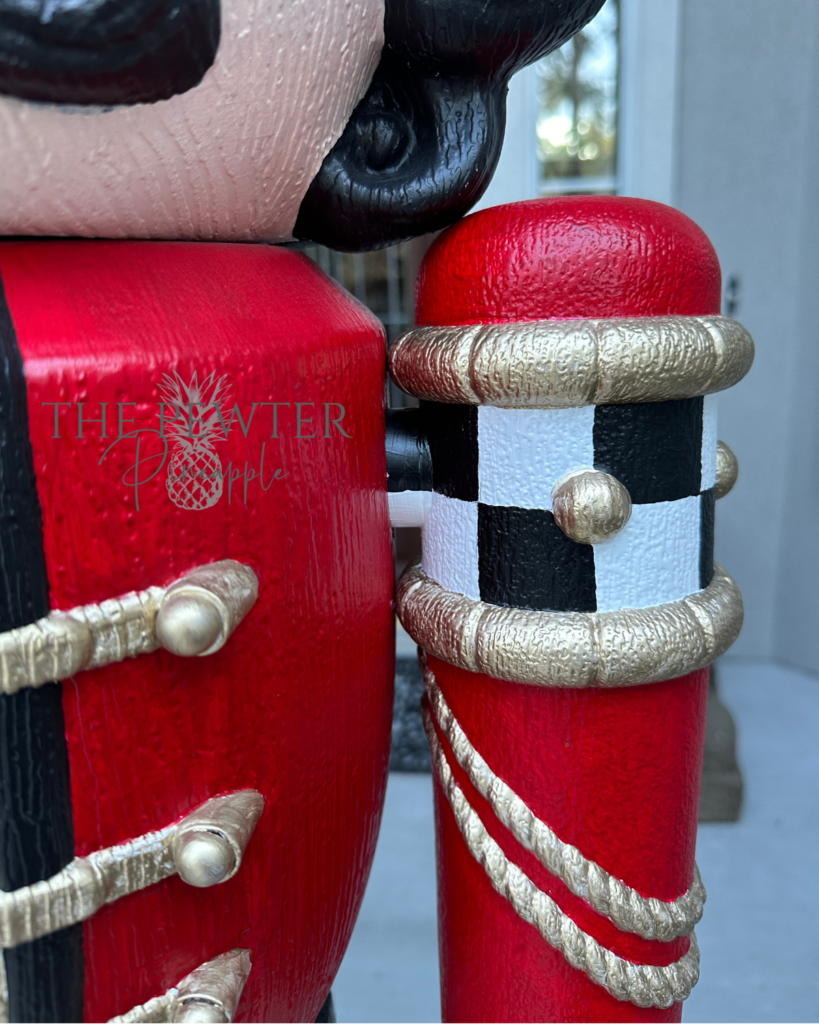
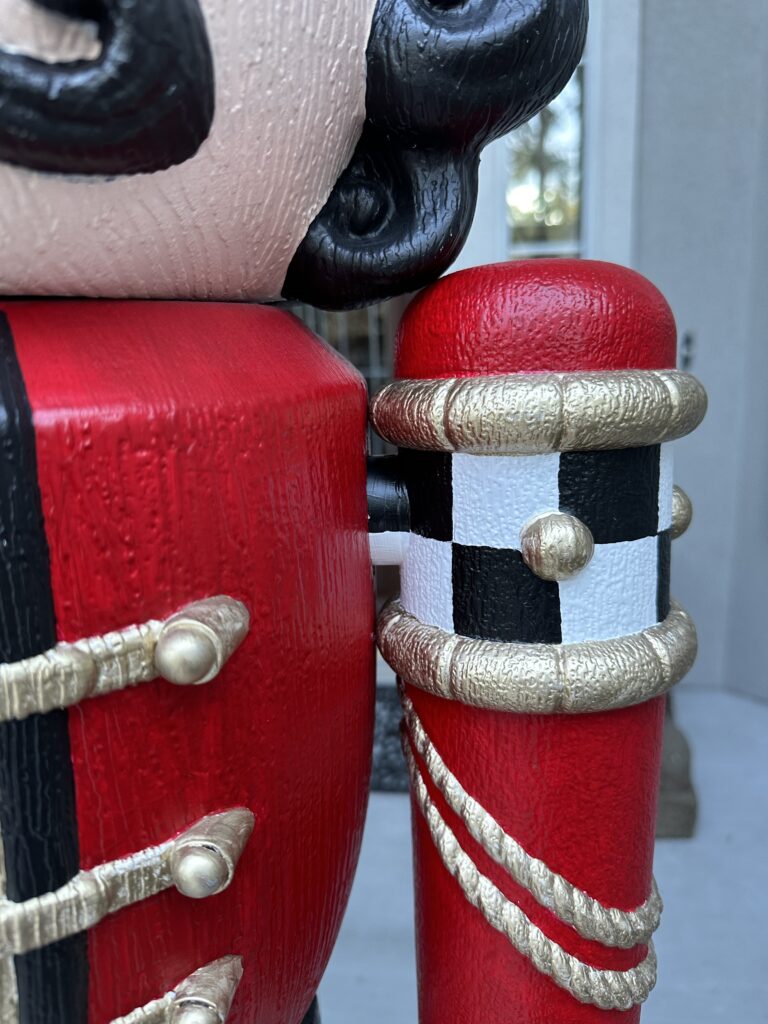
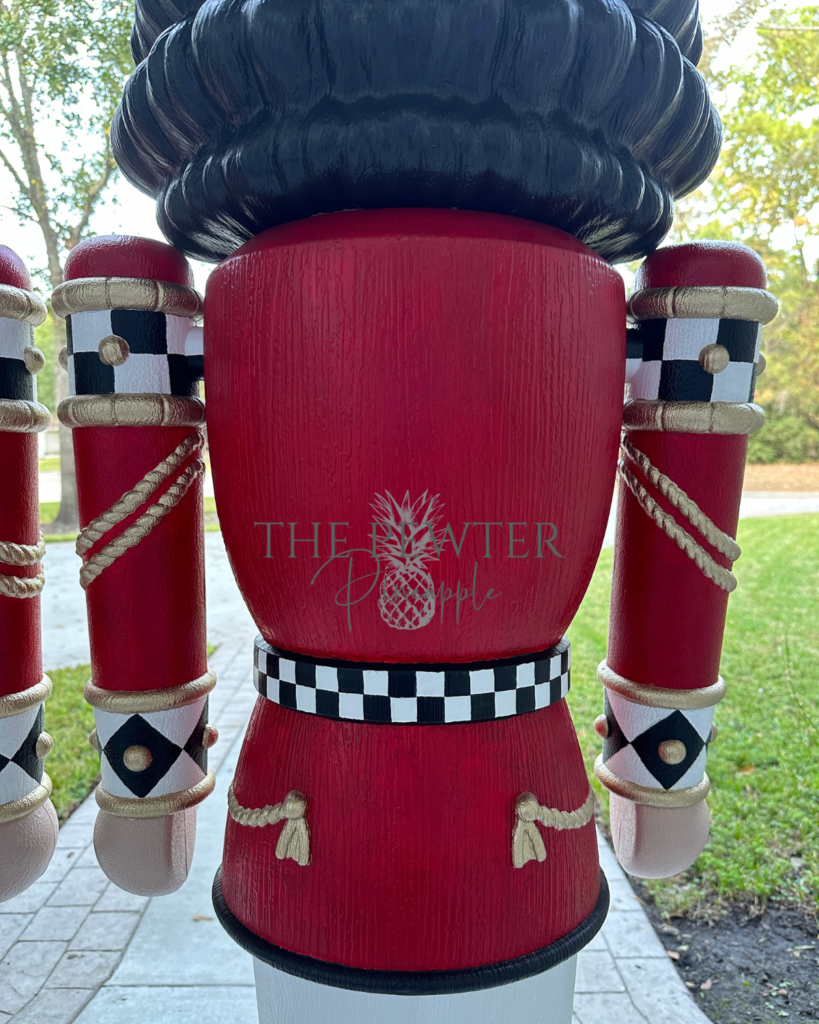
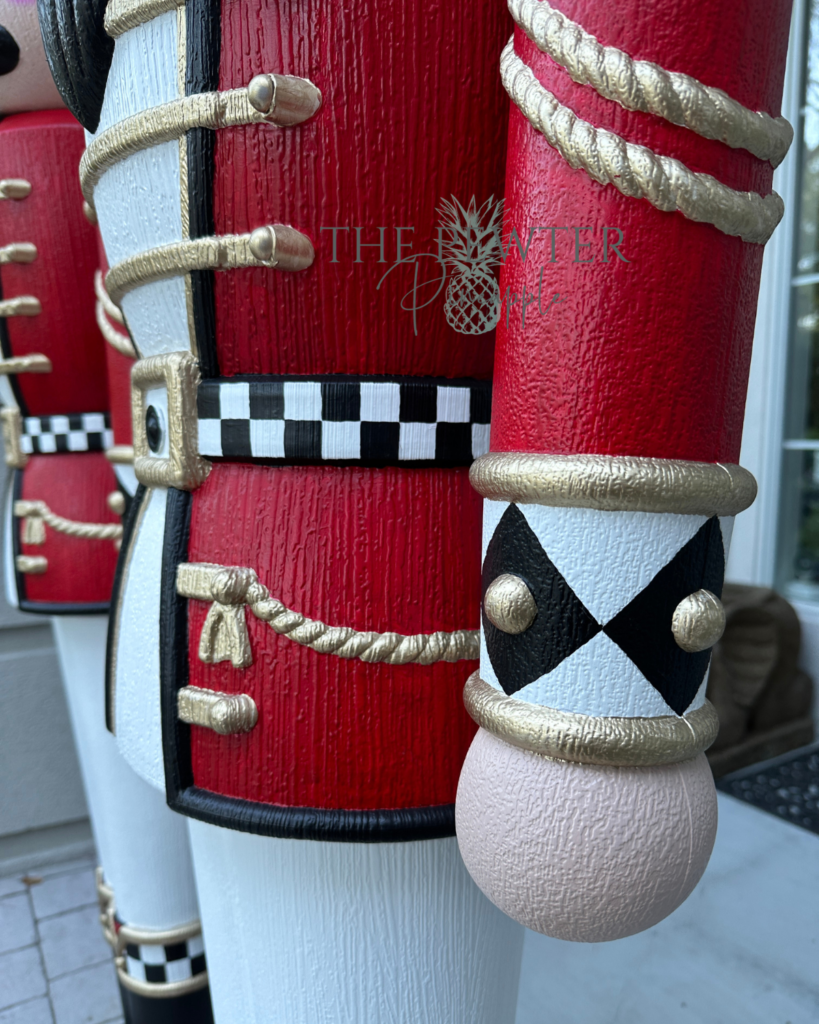
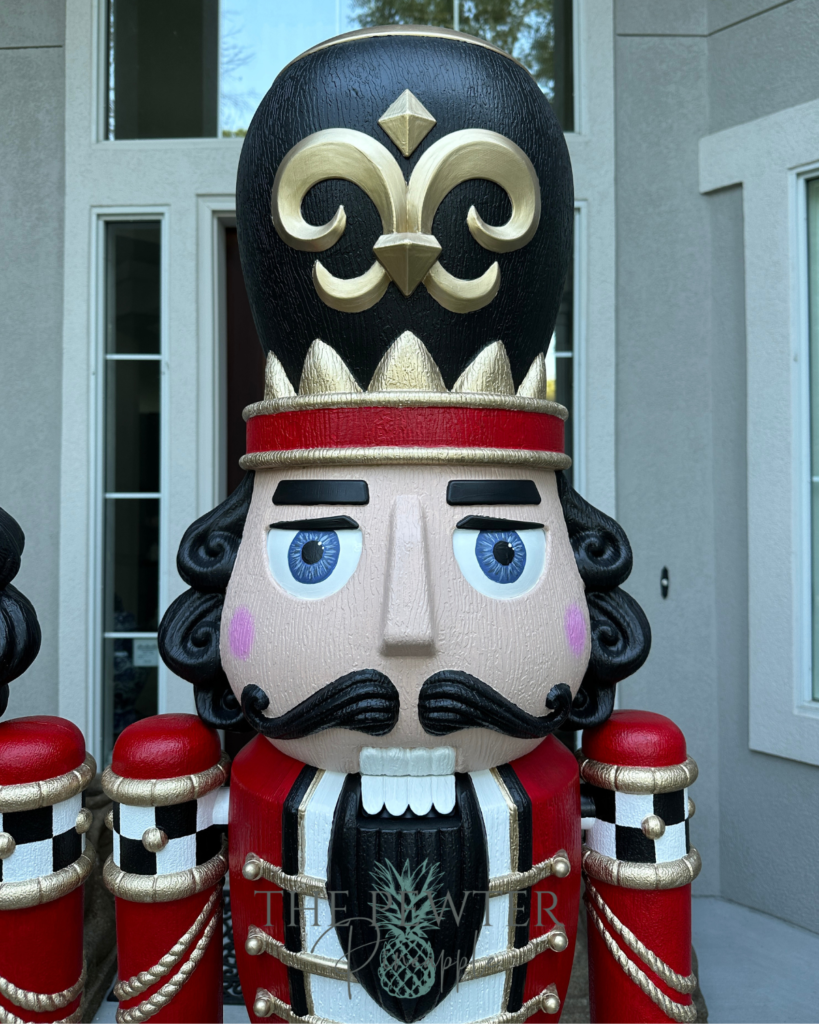
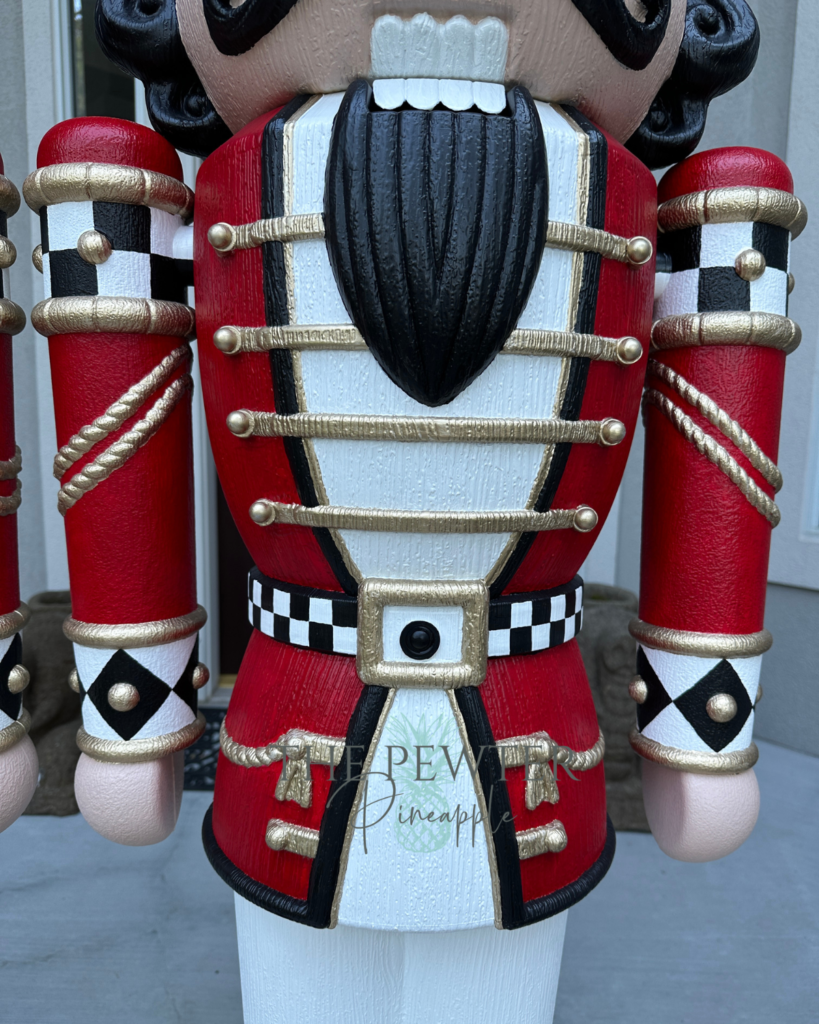
Once we had our design I did some research on paint. I wanted to be sure we used an outdoor safe paint because there is nothing worse than sun faded paint. First we primed all of the pieces with Krylon ColorMax indoor outdoor white primer. We painted each piece individually, so we made sure to cover all of the attachment pieces with painters tape. We did a light coat over everything which took one entire can. Then we used Art Deco Acrylic Patio Paint Outdoor in Tuscan Red, Wrought Iron Black, White, and CraftSmart Outdoor Golden Brown for skin. I added a small drop of red to the skin color to warm it up a bit. For the gold we used Folk Art Mayan Gold Metallic Finish Treasure Paint. This gold had the best coverage of the 3 types that we bought. Any areas that stayed white, we went over with white acrylic because the acrylic finish is slightly shiny compared to the finish on the primed nutcracker. Brush selection is also super important! You’ll want to have a lot of different sizes and shapes. I had 4 brushes that I preferred for the whole thing but I think my mom used 10+.
The red paint probably took the most coats, at around 3-4. The textured areas of gold took 2-3 coats and the flat areas of gold took 3-4 coats of paint. The black covered extremely well and only required one coat. Be sure to look at each piece in the sunlight after you’ve painted it. It was shocking how different things looked outside vs inside. In total we used 3 2oz bottles of black, 3.5 2oz bottles of red, half of a 4oz bottle of white, 7/8 of the 2oz skin color and about 3/4 of the 4oz bottle of gold.
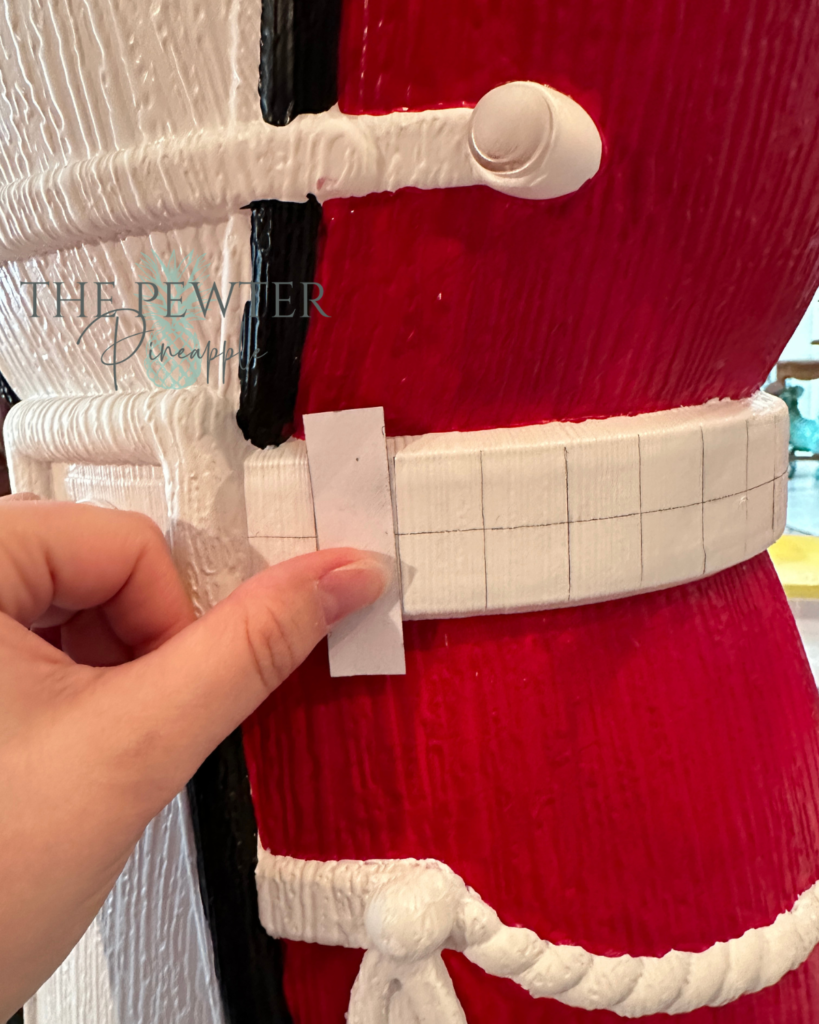
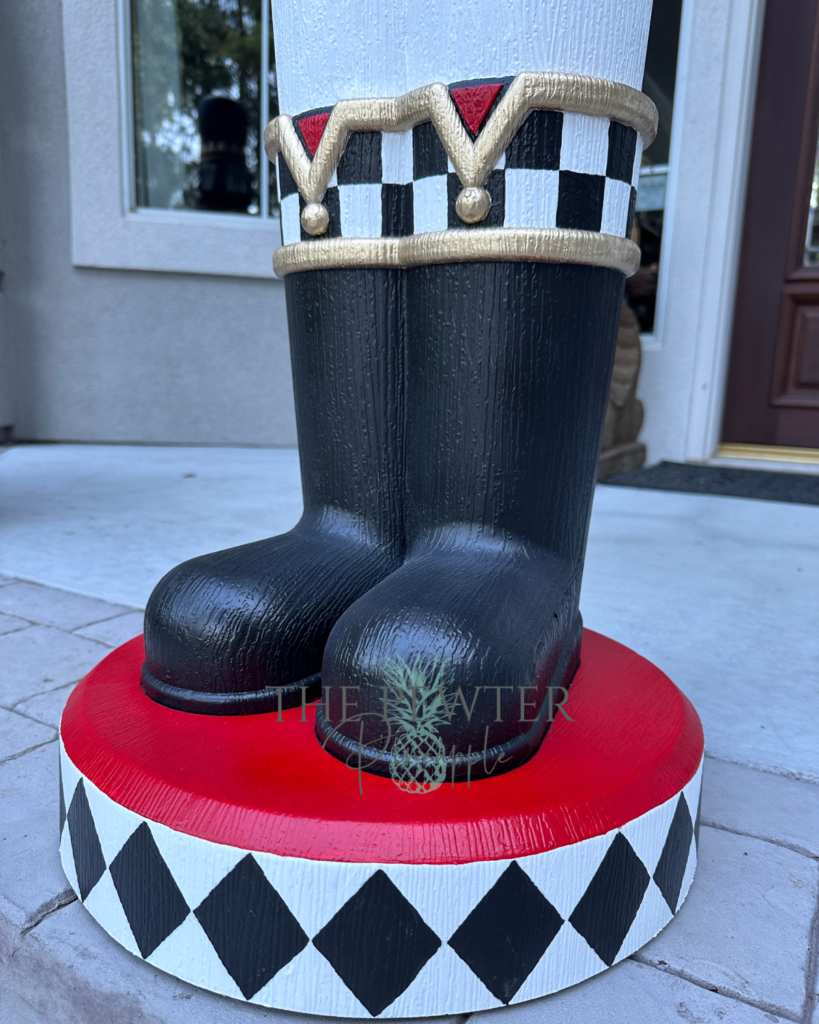
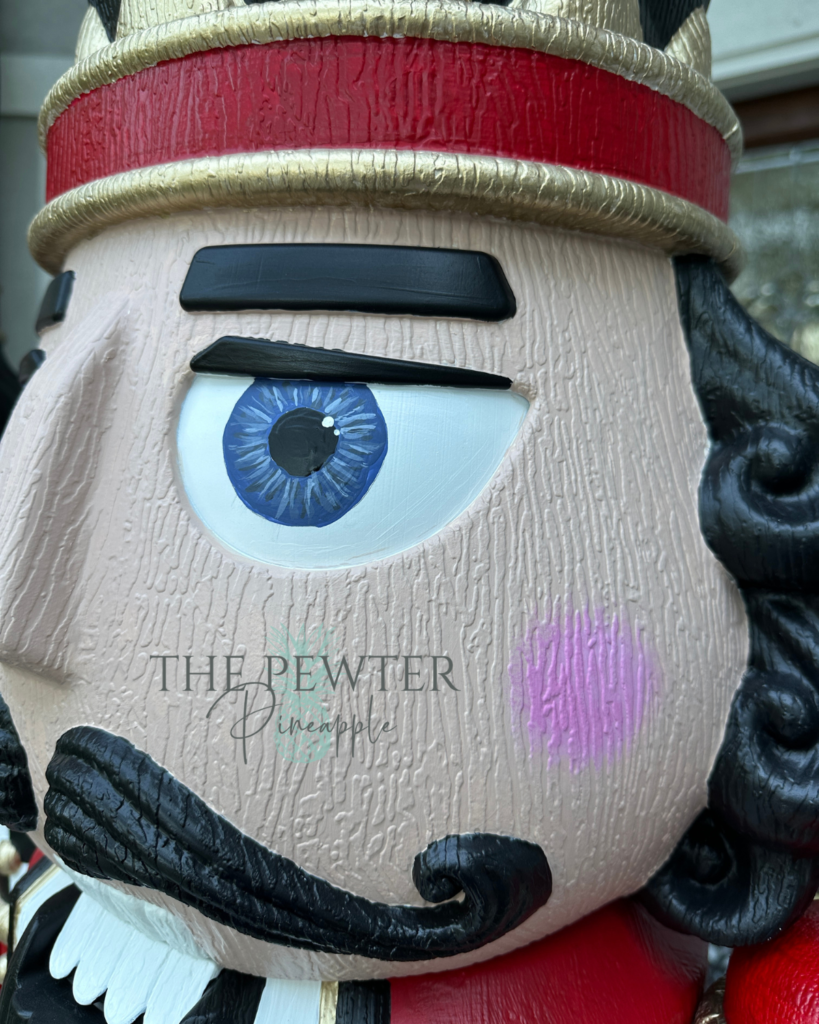
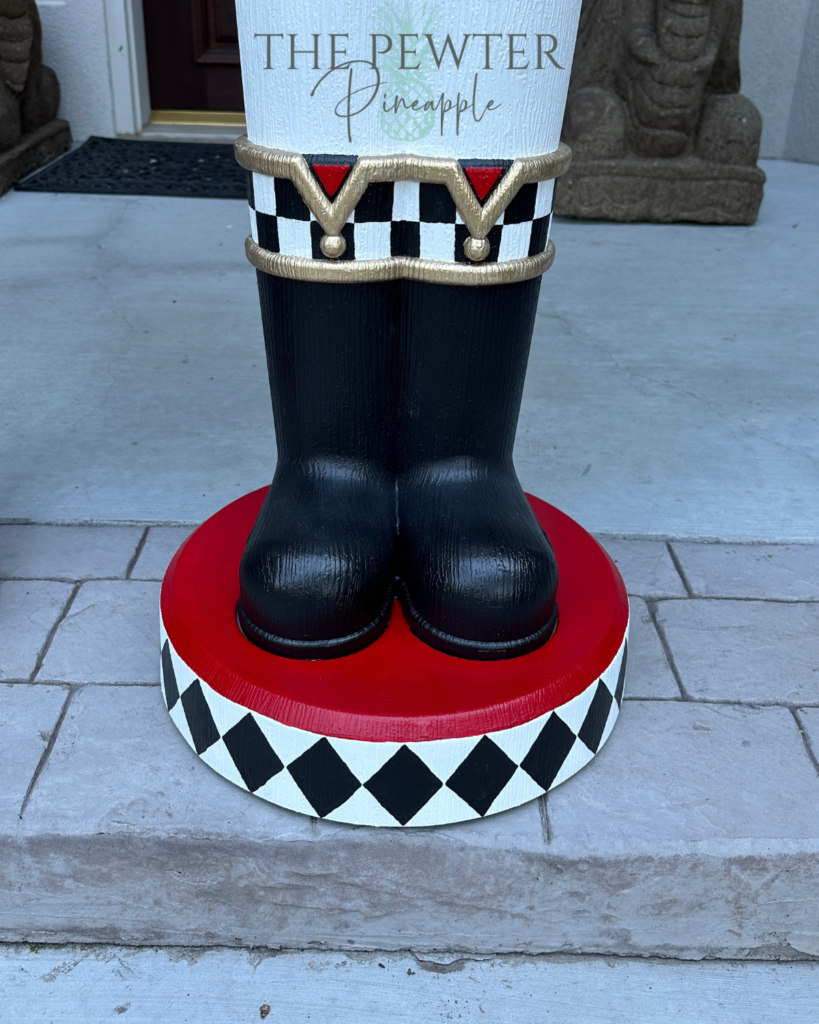
To do the diamonds and checks we created templates out of poster board that we used to draw on lines with a pencil. We also created templates for the eyes using poster board. The eyes we’re painted using a blue acrylic we already had and the detail colors in the eye are made by adding white and black to the blue color. The eyes will feel a little awkward up close, but when you step back the detail lines all blend together to make a really nice eye. Huge props to my mom for her creativity with the eyes and dedication to creating all of the black and white patterns.

There is some method to the madness of what order to paint which color. I might recommend to start with any white or light pieces and then build from there, but a lot of touch ups will be needed. This project probably took about 40 hours with two people painting (so basically 80 hours). It is not for the faint of heart! If you’re looking to make it a little less time consuming, try doing less intricate designs and choosing paint that is extremely thick, requiring very few coats.
When we went to put them together after they were done, we realized that the paint that goes around the upper arm needs to extend onto the arm attachment piece because you can see this when it’s assembled. We also noticed that the top of the arm rubs against the hair and the gold bands around the upper arm rub on the body. So be sure to be careful when attaching these pieces. We had to go back and do some touch ups because we weren’t careful the first time around.
We painted directly over the lights and motion sensor because we’re not sure if the lights will be used but for sure the motion sensor will not. No need to scare the delivery people in their busiest time of year! The lights are still visible even though we painted over them.
To finish off the nutcrackers we used Krylon Satin Finish to protect the acrylic paint. Again we only used one bottle, although this seemed to go a lot further than the primer did. We’re hoping that this will protect them from scratching and maybe just a little bit from the elements.
Well, if you’ve read this far I’m sure you’re more than ready for pictures of all the details. So here they are! If you have any questions feel free to ask in the comments!

What a fun project for you both! They look great, so much detail. Wonderful work ladies!
These are so amazing and festive. I love the combination of black and white checks and diamonds… they look so jaunty! And thanks for the detailed “How To”!!
These are magnificent! Where did you find Tuscan red acrylic patio paint? Did you get paint from a hobby lobby or michaels?
Hi Wanda! The Tuscan Red came from Michaels. I believe all of the paints came from Michaels, except for the gold. I got that one from Amazon. Good luck on your project! We hope it turns out fantastically!
I just got mine and hopefully will be able to do this. Yours are beautiful. Thank you for sharing
Thank you so much Patty! I hope yours turn out great.
We just bought two of these, we, my sister and I. Your article has been super helpful because we haven’t started yet so you’ve kept us from making some mistakes – I’m not sure we would’ve primed them. You did an amazing job! I was wondering if you could elaborate on how you made stencils for the black and white area out of posterboard. Did you draw on there and then cut out?
Hi Diana! So glad we could help a little! For the stencils a lot of calculations are needed! Each one was a single piece that we picked up and moved each time, rather than one large stencil. You can see the stencil we used for the vertical lines on the belt in one of the photos (next to the close up of the eye). For the diamonds on the boots, we calculated how wide the diamond could be to make sure that we had whole diamonds all the way around. We cut out a single diamond and centered it in the front and then moved it around the base. Yes, each stencil was drawn onto the poster board and then cut out. This could also be done with a cricut, especially if you would like multiples of each stencil. I hope this helps! Good luck and I hope they turn out amazing!
I bought an 8′ tall Nutcracker with a drum -lights & music works. It is ‘shiny RED & BLUE chrom’ like paint . I’ve wanted a nut cracker forever and they were always sold out. I’m thrilled! I’d like to paint it similar to yours. (McKC style) Not sure how to go about it with this shiny paint on pants/jacket . Any help and advise is greatly appreciated.
Hi Tina! Congrats on your nutcracker!! I would definitely recommend using primer before you start. I’ve been seeing people use a light purple for their primer because then the areas that you are going to paint a darker color fill in better. If the surface is smooth and shiny, you may also want to slightly rough it up with some sand paper before you prime it. That will help the paint stick to a shiny surface. Good luck with your project! I hope it turns out exactly as you’re hoping!